Tuesday, October 16, 2012

Homemade Almond Butter


Did you ever tried to make your own nuts butter? I didn't...'til today!  The fact is, we are all so busy, with work, kids, school etc., that is easier go to the grocery store and just pick up a ready whatever it is from the shell!  But, if you only try once to make your own stuff at home, believe me, you will never go back to the store brand!  Especially when something is so easy to make, like the almond butter!  Let's start, and be prepared..it will take a while!
Put your almonds in the food processor with the "S" blade fitted.


Depending of the size of your food processor, you can grind 3 to 4 cups of almonds.
Are you ready? Put the lid  and turn it on! 


 This is the consistency after 5 minutes or so. Keep going!
 You will start notice that the ground almonds are sticking around the edges of the bowl. Stop, and scrape down the sides every few minutes, just to be sure that everything is blending evenly.  If the dough gets a little hard, just use a spoon to break it down.

After 10-15 minutes, the oils released from the almonds will start to stick together to form a kind of ball.  You will also notice that the bowl become pretty warm.  It is completely normal.
And then, when you are probably ready to give up, the miracle happen!


The sticky ball is now an almost smooth paste! But, you are not done yet..another couple of minutes and you will have the final result!
TA-DAA!!! Here is your homemade almond butter! You can be proud of yourself...especially for the patience :) !

Tips:
You can use raw, or roasted almonds. Raw almonds takes a bit longer. 
You can roast your own almonds in the oven at 350F (325 if using a convection oven like me), for 10 to 12 minutes.  Then, throw in the food processor still warm, they will break down a lot faster.
You can add salt and spices for your personal taste.  I added 1 tsp of pumpkin pie spice to mine! It is all about experimentation!


Enjoy!

Saturday, October 13, 2012

Homemade Almond flour


I was thinking to post a recipe using almond flour.  But, then I realized, that not everybody know about this awesome, multi-use, super healthy goodness! And, most of all, that you can make your own!
Let's start with what it is.  To make almond flour, the almonds are blanched (the skin is removed in a water bath). Then, they are cut into sliced or diced almonds. The result of this process ( a sort of almond sawdust), become almond flour.  We are not done yet!!  At this point, the texture is still coarse, so the flour is put through a screen with tiny holes to ensure a very smooth, uniform and fine consistency. Now, in stores you will find also the Almond Meal.  Almond Meal are whole, ground almonds that still have the skin on them.
Many people say that if a recipe calls for blanched almond flour and you use instead the almonds that still have the skin, the recipe won't work.  In my personal experience, I use sliced almonds with the skin on, and I never had any problem! The only thing that I would recommend, (for personal experience again!) is to use a coffee grinder, instead the food processor. I will show you why:

With the coffee grinder.....
and with the food processor!

As you can see, the grinder makes a finer flour, which is much better to get a lighter texture in your baked goods!  I did read somewhere, that is nearly as smooth as the flour made using the super expensive ( still awesome!!) Vitamix! The only "problem", is that the grinder can only handle 1/2 cup of almonds at a time, but, if you are not in hurry, this is definitely a super alternative! :)


Wednesday, October 3, 2012

Let's talk about flours!

Is really amazing  how quickly sometimes you can change some habits (bad) with others (good)!  That's what happened to me when I discovered the nuts flours!  I banned white flour from our house long time ago already.  You know why white flour is not good for you...right??  Really??  You don't???  Ok..ok...let's have a chatty :)
"The whiter the bread, the quicker you’re dead!" – old saying.   


What does "enriched" mean? Enriched flour is flour in which most of the natural vitamins and minerals have been extracted. This is done in order to give bread a finer texture, increase shelf life and prevent bugs from eating it (bugs will die if they attempt to live off it).
Why is enriched flour bad? When the bran and the germ (the parts of the wheat that contain vitamins and minerals) are removed, your body absorbs wheat differently. Instead of being a slow, steady process through which you get steady bursts of energy, your body breaks down enriched flour too quickly, flooding the blood stream with too much sugar at once. Your body then has to work hard to absorb the excess and stores it as fat. This causes quick highs and lows in your blood-sugar level which can lead to type-two diabetes and obesity.

Here is some others  interesting numbers....
  • Virtually all of the vitamin
  • Fifty percent of the calcium
  • Seventy percent of the phosphorus
  • Eighty percent of the iron
  • Ninety eight percent of the magnesium
  • Fifty to 80 percent of the B vitamins.


  • Flour used to be aged naturally to improve its baking quality. The milling industry now uses a gas known as chlorine oxide as an aging, bleaching, and oxidizing agent. The Environment Protection Agency  warns that chlorine oxide is a dangerous irritant. Chlorine oxide interacts with some of the proteins in the flour and produces alloxan, a product of the decomposition of uric acid. Alloxan is a poison used to produce diabetes in healthy laboratory animals so that researchers can study diabetes “treatments.”
    Other chemicals used on flour include nitrogen oxide, nitrosyl, and benzoyl peroxide mixed with various chemical salts.
    But, how exactly is flour bleached?
    Peroxides are used as bleaching agents in flour processing. In the United States, the most common flour bleaching agent is benzoyl peroxide. (Yes, the same benzoyl peroxide topically used to treat acne.) Several nations, including the European Union, Canada, and China (strange, hu?!?), have banned the use of benzoyl peroxide and other peroxides as food additives...geez..I wonder why?!?
    So, now you are probably thinking, ok, I stay away from bleached flour, and go for the unbleached one, right? WRONG! Unbleached flour may still be bromated. Bromation is the addition of potassium bromate to improve flour’s baking action.
    The primary concern regarding the use of bromates in baking is its demonstrated link to cancer in laboratory animals. It was first found to induce tumors in rats in 1982. However, since 1991, instead of banning bromate outright the FDA, with somewhat limited success, has merely encouraged bakers to voluntarily stop using it.
    Bromates have been banned in numerous countries, including the United Kingdom in 1990 and Canada in 1994. In addition, in 1991, California declared bromate a carcinogen under the state’s Proposition 65. As such, baked goods sold in California would have to bear a store level cancer warning if they contained more than a certain level of bromate. As a result, most California bakers have switched to bromate-free processes.
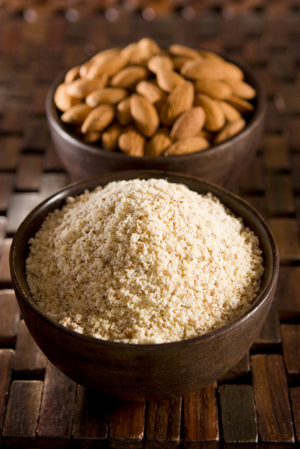
    I absolutely think that is very important that everybody know how bad white flour is.  There are so many alternative out there, like whole wheat flour, or for who has celiac disease oat flour, coconut flour, rice flour and the nut flours, which include my favorite almond flour!
    I use it all the time, baking or cooking, and I am happy, because I know that I am using good, healthy ingredients! 

    Wednesday, July 18, 2012

    Happy holidays!

    Hi blogger friends! I didn't write a lot these days, because as you know, I am on vacation in my beautiful Sardinia! Since I only have 2 weeks left in here, I am going to enjoy my family as I can, so I will be posting again when I will be back. I have a lot of things to talk about and a lot of recipes to share with you. Until then, have a wonderful summer my friends!

    Thursday, July 12, 2012

    Zucchini time!

    Don't you like tomato sauce? I do :) but, I also like all kind of vegetable sauce, like  broccoli, mushrooms, kale etc. Is good, is fast and is something different from the red sauce!

    What you need:
    4 medium fresh zucchini
    1 small onion
    2 tbs of extra virgin olive oil
    1/2 glass of  milk ( I use almond or soy milk, but any kind of skim milk is fine)
    1/2 tsp of salt
    1/4 tsp of pepper

    Heat the oil in a large pan and add the chopped onion. Wash the zucchini, cut off the ends and cut in pieces. Don't worry, they don't have to be too nice or too small since we are going to blend them later!


    Put the zucchini in the pan with the onion, and add the milk, salt and pepper.


    Put the lid on and let it cook for about 30 minutes or until the zucchini are tender.
    Turn the heat off, let it cool a little, and put it in a blender. I usually blend it in 2 times, it is easier!


    Et voila'! Zucchini sauce ready to serve with pasta, or if you prefer, eat it just like that, straight from the bowl!


    Friday, July 6, 2012

    Apple banana sauce

    My kids love applesauce! Not only apple, every fruit sauce actually!  I usually buy the organic one, trying to stay away from the others. But, there is a but....even if is organic, when I buy it, I always have that feeling that says: " Hey you, lazy butt! Is it too much work to try to make your own??? " Bu,t it usually last a few seconds, until my older son reminds me to hurry! Well, today, since I am still on vacation in my Sardinia, and  have a little extra time, thanks to my parents, I decided to try it! WHOOHOO! I looked for recipes on internet, but they all called for a lot of apples. ! lb, 2lb..really? Come on, this is my first try, I need something smaller and faster. So, I decided to be brave and try by myself without recipes. And heck, I did a good job! Fast, easy and super good! Now, this is only a simple try, so, don't be disappointed for the 3 ingredients. This is one of those recipes that you can easily change, add, or modify to suit your taste! 

    What you need:
    1 apple
    1 banana
    1 Tbs Agave nectar or honey
    1 to 2 Tbs fresh lemon juice
    1/3 cup water

    Peel the apple, the banana and cut in pieces. Put them in a small pot with the water, lemon juice and honey.

    Tuesday, July 3, 2012

    MY LITTLE ISLAND!

    There is nothing better than a vacation! And, if your destination is your hometown, is really awsome!
    Last time I was here was 3 years ago....too long! Did you ever seen a sea more beautiful than this? Sorry, I am not partial ;)